User Guide
Convert files or a folder
Select one or more EDI files with Browse…, or select a single folder. You can also enter paths directly. For a folder, use File name pattern to limit the input, for example *.edi, and select Include subfolders if you want to process nested folders.
Choose an Output folder. The app creates it if it does not exist. Using a separate folder for converted output makes the results easier to find.
Leave Output file blank to create results for each input file. To combine multiple files, enter an output filename such as payments.csv or payments.xlsx. Combine files of the same transaction type and use an extension that matches the selected format. Related CSV tables may still be written as additional files.
Click Convert and review Progress for the completion message or errors. If a conversion fails, check the message, the input file, your license, and whether you can write to the output folder.
Choose an output format
| Format | Use it for |
|---|---|
| CSV | Reviewing tabular data in a spreadsheet or importing it into another system. Related tables can be separate files. |
| Excel | Reviewing the same tabular data in a workbook, with related tables on separate worksheets. |
| JSON | Keeping nested data, such as a claim with its service lines, together for software integrations. |
| NDJSON | Processing JSON records one at a time. Each line contains one JSON object. |
CSV and Excel support 835, 837P, 837I, and 834. For other transaction types, use JSON or NDJSON; see the JSON documentation for the available structures.
Choose a CSV layout
Open Settings > Preferences… on Windows. The CSV conversion mode also controls how tables are arranged in Excel.
| CSV conversion mode | When to use it |
|---|---|
| Separate files for header and lines | Keep one row per claim and a separate service-line table. Useful for claim totals and database imports. Excel puts these tables on separate sheets. |
| Single file; header repeats all rows | Keep claim information alongside every service line when sorting or filtering by procedure. |
| Single file; header on first row | Read each claim followed by its services without repeating all claim values on every row. Identifiers still connect later rows to the claim. |
Here, header means the claim-level record, not the column-name row. For 834 enrollment, the layout follows the member and coverage structure instead of claims and service lines.
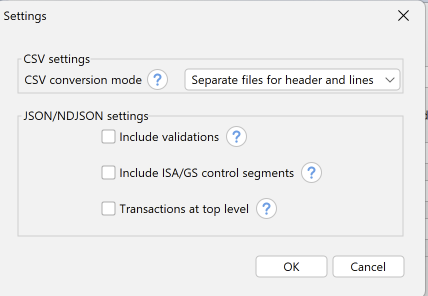
The Settings dialog on Windows, with separate files selected for headers and service lines.
Compare the actual files on the Output Examples page. In particular, do not sum repeated claim amounts across service-line rows.
JSON options
The same settings dialog offers three optional choices for JSON and NDJSON:
- Include validations adds validation results to the output.
- Include ISA/GS control segments includes the interchange and functional-group envelopes as JSON objects.
- Transactions at top level writes each transaction once as a separate top-level object instead of repeating its information inside each claim, payment, or member. This can reduce output size.
Save the settings, then run your conversion. Settings are remembered for future sessions.
For scheduled jobs, scripts, or custom CSV schemas, use the CLI tool. It uses the same conversion engine and offers additional command-line options.